You can shoot in 4K with the sharpest lens on the market, but if your audio is muddy, hollow, or full of background noise, viewers will tune out. Good sound is what makes a video feel professional. And for that, you need a good external microphone.
But choosing the right microphone isn’t just about specs or price, it’s about matching the mic to your filming style, environment, and creative goals. This guide breaks down the main types of microphones, when to use each, and what to look for, so you can capture clear and engaging audio every time.
TL;DR
- Great video demands great audio, your microphone choice matters more than most beginners realize.
- Different mics serve different purposes: shotgun for directional pickup, lavaliers for interviews, handheld for events, USB mics for streaming/voiceovers.
- Match your mic to your shooting style: vlogging, filmmaking, interviews, or tutorials.
- Wireless systems add freedom but also cost more and require care with interference.
- Accessories like windscreens, boom poles, and recorders can make or break your setup.
- Common mistakes: using built-in camera mics, ignoring monitoring, or choosing the wrong mic for the environment.
Understanding Microphone Types
Before you buy a microphone, it’s important to understand the different types available and what they’re best suited for. Each one has unique strengths and weaknesses depending on how you film.
1. Shotgun Microphones
These highly directional mics are designed to capture sound from directly in front while rejecting noise from the sides. They’re mounted on cameras or boom poles, making them ideal for filmmaking, vlogging, or outdoor shoots.
2. Lavalier (Lapel) Microphones
Small, clip-on mics often used in interviews, presentations, or tutorials. They provide consistent audio because they stay close to the subject’s mouth, even if the camera moves. Wired versions are affordable, while wireless kits allow more freedom.
3. Handheld Microphones
Best for on-the-go interviews, reporting, or live events. They’re durable, easy to use, and deliver reliable audio in noisy environments when held close to the speaker.
4. USB Microphones
Popular for streaming, voiceovers, and online tutorials. They plug directly into a computer and are easy to use, though they’re less versatile on location since they’re not designed for cameras.
5. Studio Microphones
Studio microphones are designed for controlled indoor environments where sound quality is the top priority. They’re most often used for voiceovers, podcasts, ADR (Automated Dialogue Replacement), or recording narration for videos.
6. Wireless Microphone Systems
A transmitter and receiver system that works with lavs, headsets, or handheld mics. Great for mobility during shoots, but they’re more expensive and require careful frequency management to avoid interference.
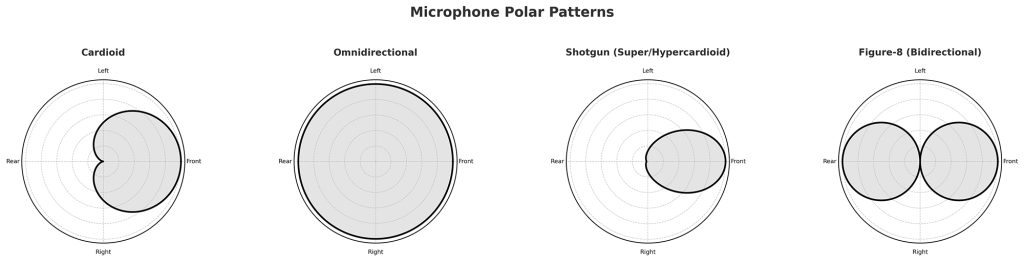
Microphone Pickup Patterns Explained
A microphone’s pickup pattern (also called a polar pattern) describes how it captures sound from different directions. Choosing the right pattern is just as important as choosing the right type of mic.
Cardioid
- Shape: Heart-shaped pickup, focused at the front.
- Best for: Interviews, vlogs, or situations where you want to isolate one voice.
- Pros: Rejects noise from behind the mic.
- Cons: Still sensitive to side noise if not aimed properly.
Omnidirectional
- Shape: Picks up sound equally from all directions.
- Best for: Roundtable discussions, capturing natural ambience, or when the subject moves a lot.
- Pros: Sounds natural, no need for perfect placement.
- Cons: Captures everything in the environment, including unwanted noise.
Shotgun (Supercardioid/Hypercardioid)
- Shape: Very narrow forward focus with some rear pickup.
- Best for: Film sets, outdoor shoots, or anytime you need to isolate a subject from a distance.
- Pros: Excellent rejection of side noise, captures distant subjects.
- Cons: Requires precise aiming, can pick up some sound from the rear lobe.
Figure-8 (Bidirectional)
- Shape: Picks up equally from the front and back, rejects the sides.
- Best for: Interviews with two people facing each other, or stereo recording setups.
- Pros: Great for creative setups and music recording.
- Cons: Useless in noisy spaces since it captures both directions.
Quick rule of thumb:
- Cardioid for solo creators.
- Omnidirectional for groups and ambient capture.
- Shotgun for filmmaking.
- Figure-8 for two-person setups or creative audio.
Matching the Mic to Your Shooting Style
The “best” microphone isn’t universal. It depends on how you shoot and the environment you’re working in. Choosing the right type will save you countless headaches in post.
For Solo Creators and Vloggers
If you film yourself in controlled spaces or outdoors, an on-camera shotgun mic (mounted directly or on a small boom arm) keeps your setup light and focused on your voice. If you move around a lot, a wireless lavalier offers more consistency while staying discreet.
For Interview and Tutorial Content
Recording conversations, teaching on camera, or making sit-down videos? Lavalier mics are practical because they deliver consistent audio, no matter how much the subject shifts. For stationary desk setups like tutorials, streaming, or podcasts, a studio condenser mic (USB or XLR) can provide rich, broadcast-level sound.
For Event Coverage or Street Work
Covering live events, reporting, or street interviews calls for handheld dynamic mics. They cut through background noise and give you clear control over who’s speaking. A wireless handheld system is even better when mobility is essential.
For Cinematic Productions
Short films, documentaries, or narrative projects typically rely on a shotgun mic on a boom pole, which isolates dialogue while keeping the mic out of frame. Many pros also use lavaliers as backup in case the boom misses a line. Together, this combo provides flexible, professional-level audio capture.
You should also start learning about editing audio by reading this guide on basics of audio editing for video.
Condenser vs. Dynamic Microphones
Not all microphones capture sound in the same way. The two main categories –condenser and dynamic– differ in design, sensitivity, and ideal use cases.
Condenser Microphones
- Pros:
- Highly sensitive, detailed sound capture
- Wide frequency response, excellent for vocals
- Ideal for studio voiceovers or quiet environments
- Cons:
- Require phantom power
- Pick up room noise easily
- Can be fragile for fieldwork
Dynamic Microphones
- Pros:
- Durable, less sensitive to background noise
- Handle high sound pressure levels (shouting, loud instruments)
- Don’t require external power
- Cons:
- Less detail and range than condensers
- Often need more gain from preamps
Quick rule of thumb:
- Condenser = detail and nuance (studio, narration, controlled environments).
- Dynamic = durability and focus (live events, noisy sets, interviews).
Wired vs. Wireless Systems
One of the biggest decisions when choosing a microphone is whether to go wired or wireless. Each has advantages and trade-offs depending on your setup.
Wired Microphones
- Pros:
- Reliable connection with no risk of dropouts or interference.
- Generally cheaper than wireless systems.
- No need to worry about battery life.
- Cons:
- Limited mobility: you’re tethered to the camera, recorder, or mixer.
- Cables can clutter your setup or accidentally get pulled.
Wired is ideal for controlled environments (interviews, tutorials, studio shoots) where movement is minimal and reliability is key.
Wireless Microphones
- Pros:
- Maximum freedom of movement, perfect for vlogging, events, or outdoor shoots.
- Cleaner setups without visible cables.
- Cons:
- More expensive.
- Risk of signal interference, especially in crowded areas.
- Requires batteries or charging.
Wireless is the go-to for dynamic shooting situations where your subject is moving or you need a discreet setup.
Pro Tip: Many creators use a hybrid setup: lavaliers or handhelds with wireless transmitters for mobility, and a wired shotgun backup for reliability.
Budget vs. Professional Options
When choosing a microphone, your budget plays a major role. The good news is, you don’t need to break the bank to get usable, good-quality audio. But it’s also worth understanding what you gain by investing in professional gear.
Budget-Friendly Options
- Price Range: $30–$150
- What You Get:
- Entry-level lavaliers (wired or affordable wireless sets)
- Compact on-camera shotgun mics
- USB mics for direct computer recording
- Pros: Accessible, portable, good enough for social media, YouTube, and beginner projects.
- Cons: Limited durability, less control over sound, weaker performance in noisy or outdoor environments.
Budget gear is perfect for beginners, content creators just starting out, or those testing different formats before committing to more serious equipment.
Professional Options
- Price Range: $300 and up (sometimes into the thousands)
- What You Get:
- Broadcast-quality lavaliers and wireless systems
- High-end shotgun microphones
- XLR-based studio microphones
- More advanced accessories (shock mounts, preamps, field recorders)
- Pros: Superior sound quality, better noise rejection, reliable build quality, and more flexibility in post-production.
- Cons: Higher cost, bulkier gear, sometimes steeper learning curve.
Professional gear is the right choice for client work, documentary filmmaking, or commercial projects, where flawless sound is a must.
Tip: Start small, but buy the best you can afford. Audio gear lasts a long time, and a good microphone will serve you across multiple projects as your skills grow.
Quick Comparison of Microphone Types
| Type | Best For | Pros | Cons | Typical Pickup Pattern |
| Lavalier (Lapel) | Interviews, vlogs, on-camera talent | Hands-free, discreet, consistent sound | Can pick up clothing rustle, usually lower quality than larger mics | Omnidirectional (common) |
| Shotgun | Film, outdoor shoots, dialogue from a distance | Strong directional focus, isolates subject | Needs precise aiming, can pick up rear noise | Supercardioid/Hypercardioid |
| Handheld | Live events, reporting, stage use | Durable, easy to pass around, good rejection | Bulky on camera, needs to be held close | Cardioid or Dynamic-based |
| On-Camera (Built-in/Hot Shoe) | Run-and-gun shooting, vlogging | Portable, easy setup | Limited sound quality, picks up camera handling noise | Cardioid or Supercardioid |
| Studio Microphones (Large Diaphragm Condensers) | Voiceovers, podcasts, music, controlled environments | Rich, detailed sound, highly sensitive | Not portable, picks up every sound in the room | Cardioid, Omni, Figure-8 (switchable) |
| Condenser | Controlled environments, studio, vocals | High sensitivity, detailed sound | Fragile, requires power (phantom or battery) | Usually Cardioid/Omni/Figure-8 |
| Dynamic | Live sound, loud environments | Durable, no power needed, good noise rejection | Less detailed than condensers | Usually Cardioid |
Connections and Cables: How Your Mic Talks to Your Camera or Recorder
The type of connection your microphone uses affects both sound quality and compatibility. Here are the most common ones you’ll run into:
- XLR: The professional standard. Balanced connection, low noise, and durable. Found on most high-end mics, mixers, and recorders. Requires an interface or recorder with XLR inputs.
- USB: Plug-and-play for computers. Great for streaming, podcasts, and tutorials. Convenient but less flexible for professional video setups.
- 3.5mm Jack (TRS/TRRS): Common on consumer cameras, smartphones, and portable recorders. Affordable and simple, but more prone to interference and wear.
- Lightning/USB-C: Direct connections for smartphones and tablets. Handy for mobile creators, though often locked to specific ecosystems or adapters.
Rule of thumb: If you’re aiming for long-term, professional use, XLR is your best bet. For simple setups, 3.5mm or USB can still deliver excellent results.
Accessories That Make a Difference
The microphone is only half the story. The right accessories can take your audio from “usable” to “professional”, and they often cost far less than the mic itself.
Windscreens, Pop Filters, and Deadcats
- Purpose: Cut down on wind noise and plosives (like “p” and “b” sounds).
- Best Use: Outdoors, or even indoors if you’re close to the mic.
- Pro Tip: Always keep one in your kit. A $10 windscreen can save a shoot.
Boom Poles and Stands
- Purpose: Position your microphone close to the subject without showing it in frame.
- Best Use: Interviews, narrative scenes, or any setup where hands-free operation is needed.
- Pro Tip: Get a lightweight carbon fiber pole if you plan on booming for long takes.
Shock Mounts
- Purpose: Isolate the mic from handling noise, vibrations, or bumps.
- Best Use: When using shotgun or condenser mics.
- Pro Tip: Don’t cheap out here, bad mounts transmit every touch straight into your audio.
Audio Recorders and Interfaces
- Purpose: Provide higher-quality recording than most in-camera preamps.
- Best Use: Professional shoots, or whenever you want more control over your sound.
- Pro Tip: Even an entry-level recorder (like a Zoom H1n) is a huge step up from in-camera sound.
Cables and Adapters
- Purpose: Reliable connections without static or signal loss.
- Best Use: Always. A bad cable can ruin the best mic.
- Pro Tip: Carry backups, cables fail at the worst possible moment.
Takeaway: Accessories may not be flashy, but they’re the secret to consistent, professional audio. Often, they matter more than upgrading to a slightly better microphone.
Common Mistakes to Avoid
Even if you’ve chosen the right microphone, simple errors can ruin your audio. Watch out for these common pitfalls:
- Ignoring the environment: Even the best mic can’t save you from echoey rooms or loud backgrounds. Always check your location before recording.
- Placing the mic too far away: Distance kills clarity. Keep the mic as close as possible without being in the frame.
- Overlooking wind protection: Outdoor recording without a windshield or deadcat almost always results in ruined audio.
- Relying on built-in camera audio: It’s convenient, but onboard mics are rarely good enough for professional results.
- Not monitoring sound live: Skipping headphones while recording means you won’t catch problems until it’s too late.
- Forgetting backups: Batteries die and wireless signals drop. Always have a backup mic or recording option ready.
Avoiding these mistakes ensures that your microphone can actually perform to its potential.
If you want to keep learning about audio, you should also read this guide: 10 Tips to Get Better Sound for Your Video Projects.
Last Words
The right microphone can make the difference between a video that feels amateur and one that connects with your audience. Think about your typical shooting environment, your budget, and the type of content you create. Start simple, but choose a mic that matches your needs rather than just the cheapest option. Audio is half of the story, treat it with the same care you give your visuals.
Want to keep learning? Follow me on your favorite social media (handle everywhere: @MediabyHamed / search for Hamed Media) or subscribe to my newsletter for more practical tips and guides like this.
FAQ
Do I really need an external mic if my camera has one built in?
Yes. Built-in mics pick up too much ambient noise and lack directionality, making them unsuitable for professional use.
Can I use the same mic for podcasts and video?
Yes, many mics work across both formats, but lavaliers and shotguns are best for video, while large-diaphragm condensers often shine in podcasting.
What’s the best all-around microphone for beginner videographers?
A good shotgun mic is the most versatile choice for most creators, since it works both indoors and outdoors.