When most creators think about improving their videos, they focus on cameras, lenses, or lighting. But here’s the truth: if your audio is bad, no one will stick around to admire your visuals. Clear sound makes your content feel professional, trustworthy, and watchable, while poor audio instantly gives it an amateur edge. That’s why recording audio for video in the best possible way is important.
The good news? You don’t need a professional studio to capture solid audio. With some planning, the right habits, and a few key tools, you can massively improve how your videos sound. In this guide, we’ll break down 10 essential tips that will help you record clean, consistent audio no matter where you’re shooting.
TL;DR
- Scout your location first, avoid noise and echo.
- Use the right microphone for your setup (shotgun, lav, etc.).
- Always monitor audio live with headphones.
- Choose the right quality and file format.
- Place your mic correctly: close enough, not obstructed.
- Set recording levels to avoid clipping.
- Record backup audio when possible.
- Keep consistency across takes and scenes.
- Capture room tone for smoother editing.
- Do a quick test recording before you roll.
1. Scout and Control Your Recording Environment
Great audio starts before you even set up your microphone. One of the most effective steps is simply paying attention to your surroundings. Take a minute to stand still and listen: traffic, buzzing electronics, HVAC systems, chatter, or echo off bare walls can all ruin an otherwise good recording.
Here’s how to improve your environment:
- Turn off what you can: fans, AC units, refrigerators, or other buzzing devices.
- Choose a quieter spot: move away from windows, corners, or reflective surfaces that amplify reverb.
- Soften the space: carpets, curtains, furniture, or even blankets can absorb sound.
- Balance visuals and audio: if recording video, don’t pick a visually perfect location that sounds terrible.
- Plan your timing: record during quieter hours if you can’t fully control the space.
By scouting your location and controlling your environment, you’ll capture cleaner, more professional audio and save yourself hours of fixing problems in post-production.
2. Use the Right Mic for the Situation
Not all microphones are built for the same purpose, and using the wrong one can ruin otherwise great footage. Instead of relying on your camera’s built-in mic, which captures everything in the room equally, invest in an external microphone that fits your project.
Here are the most common types:
- Lavalier mics
- Shotgun mics
- USB mics
- Wireless mics
I won’t go into detail here, because I have another guide about different types of microphones and how to choose the best one for your video project.
Think of it this way: the mic you choose should match both your subject and your environment. For dialogue in a quiet room, a lavalier works beautifully. For a wide shot outdoors, a boom or shotgun is your best bet.
The key takeaway: don’t force one mic to do every job. A small collection of affordable microphones will cover more scenarios and instantly boost your audio quality.
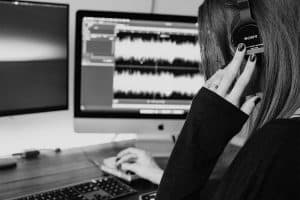
3. Monitor Your Audio Live
One of the biggest mistakes beginners make is assuming their audio is fine just because the mic is plugged in. In reality, audio issues like crackling, distortion, or background hum often go unnoticed until editing, when it’s too late to fix them.
That’s why monitoring your sound live with headphones is essential. Even a simple pair of wired earbuds is better than nothing. While recording, keep one ear on your subject and the other listening to the feed from your camera or audio recorder.
What to listen for:
- Peaking or distortion when someone speaks too loudly
- Background noise like air conditioners, traffic, or buzzing electronics
- Interference if using wireless mics
- Dead batteries or loose cables causing signal dropouts
Many cameras and recorders also show visual meters. Use these together with your ears: aim for green to yellow levels and avoid red peaks.
Monitoring live lets you catch and correct problems immediately -moving the mic closer, lowering input gain, or switching locations- instead of discovering unusable audio in post-production.
4. Choose the Right Quality and Format
Your audio format matters just as much as your microphone choice. Recording in the right settings ensures you capture clean and flexible sound that holds up in editing.
- Uncompressed vs. Compressed: WAV and AIFF are uncompressed formats that preserve the full quality of your audio. MP3 and AAC are compressed, meaning they discard data to save space but can reduce quality. For video projects, always record in uncompressed formats if possible.
- Bit Depth & Sample Rate: Aim for 48kHz, 24-bit when recording audio for video. This is the standard for film and broadcast, giving you more headroom and detail than 44.1kHz/16-bit (common in music). Some new microphones also have the option to record in 32-bit float. Use it if possible.
- File Size Considerations: While uncompressed files are larger, storage is cheaper than re-recording. It’s better to capture at the highest quality and down-convert later if needed.
Think of it like shooting video: you wouldn’t record in low resolution, then try to upscale later. The same logic applies to audio, record the best quality you can from the start.
5. Mind Your Mic Placement
Where you place your microphone can make or break your recording. Even the best microphone will sound bad if it’s too far away, too close, or pointed in the wrong direction. Placement is one of the most overlooked skills in capturing clean, professional audio.
Key principles to follow:
- Distance matters: For dialogue, keep the mic 15–30 cm (6–12 inches) from the subject’s mouth. Too far and you’ll capture echo and room noise, too close and you risk distortion and popping sounds.
- Angle is important: Aim the mic slightly off-axis (not directly in front of the mouth) to reduce harsh plosives like “p” and “b” sounds.
- Lavaliers: Clip lav mics 15–20 cm (6–8 inches) below the chin, usually on the sternum area, and make sure clothing or hair won’t rub against it.
- Shotgun mics: Position just out of frame above or below the subject, angled toward the mouth and chest. The closer you can get without entering the frame, the better.
- Boom technique: Keep movement smooth and consistent, and always aim the mic at the speaker’s sternum or mouth area, not at the forehead or shoulders.
Pro Tip: Always do a quick test recording after setting placement. What sounds fine in your headphones while monitoring might still pick up clothing noise, breathing, or background hums. Adjust before you hit record on the real take.
7. Record Backup Audio
Even when you’ve done everything right, audio can fail. Batteries die, cables crackle, wireless signals drop, or you might accidentally bump the gain. That’s why professionals almost always record a backup track. It’s your insurance policy.
Ways to set up backup audio:
- Dual-system recording: Record audio separately on a dedicated recorder (like a Zoom H5/H6 or Tascam DR series) while also capturing sound in-camera. If one fails, you still have the other.
- Safety tracks: Many cameras and recorders let you record a second audio channel at a lower gain. If a loud laugh or shout clips your main track, the safety track captures a clean version.
- Secondary mic: Place a second microphone (even a basic lav or shotgun) in addition to your primary mic. If clothing rustles ruin your lav recording, the shotgun might save the take.
- Ambient mic: Recording a room mic not only gives you backup but also provides natural ambience to blend into your edit.
Pro Tip: Treat backups as part of your workflow, not an afterthought. You may rarely need them, but the one time you do, they can save an entire project.
8. Stay Consistent Across Takes
Nothing ruins continuity faster than inconsistent audio. If your mic placement, levels, or environment change between takes, it can be very difficult to match them in post. The result is distracting jumps in tone, volume, or background noise that pull the viewer out of the story.
How to keep things consistent:
- Lock mic placement: Mark positions for lavaliers or booms so they stay the same throughout the shoot.
- Keep levels steady: Once you’ve dialed in gain and volume, avoid adjusting knobs unless absolutely necessary.
- Control the environment: If you close a window for one take, don’t leave it open for the next. Small differences like HVAC noise or street sounds can make edits jarring.
- Use the same gear settings: Make sure recorders, cameras, and wireless systems are all set the same way across scenes.
- Do a quick test playback: Between takes, listen back to confirm nothing shifted.
Pro Tip: Treat audio continuity the same way you treat visual continuity. Just as you wouldn’t move a lamp between takes, don’t let your microphone setup drift.
Start learning about audio editing by reading this guide on basics of audio editing for video.
9. Capture Room Tone
Room tone is the natural, ambient sound of your recording space when no one is speaking. It might seem like silence, but every location has a unique sonic fingerprint, whether it’s the hum of air conditioning, faint traffic outside, or just the character of the room itself. Capturing it is one of the simplest ways to make your edits smoother.
Why it matters:
- Seamless edits: Without room tone, cutting between lines of dialogue can create awkward gaps of dead silence. Adding a consistent background layer makes transitions feel natural.
- Masking fixes: When you remove unwanted noises or splice together multiple takes, room tone helps fill in the gaps so the audio doesn’t feel choppy.
- Professional polish: Editors in film, TV, and video always capture at least 30–60 seconds of room tone. It’s standard practice because it works.
How to do it:
- After recording a scene, ask everyone to stay quiet for about a minute.
- Record with the same setup you used for the dialogue.
- Save and label it clearly (e.g., “Interview Room Tone – Lav Mic”).
- Layer it under dialogue in post to create continuity.
Pro Tip: Capture new room tone every time you change locations or significantly alter the environment. No two spaces -or even the same space at different times- sound identical.
10. Always Test Before You Shoot
One of the easiest ways to ruin an otherwise great video is by discovering audio problems after the shoot. Testing your audio setup before you start recording ensures that everything works as expected and prevents costly mistakes.
Why it matters:
- Catches technical issues early: Loose cables, low batteries, bad connections, or wireless interference can all ruin a take if unnoticed.
- Avoids poor levels: Testing lets you adjust gain, avoid clipping, and confirm your levels are strong but not distorted.
- Saves reshoots: It’s much easier to fix problems on set than to try salvaging bad audio in post.
How to do it:
- Do a quick test recording before you start filming. Play it back through headphones and listen critically for hums, buzzes, distortion, or imbalance.
- Check multiple takes: Test both loud and quiet speech to ensure your settings handle dynamic range.
- Walk around with wireless mics: Make sure there’s no drop-out when your subject moves.
- Double-check backups: If you’re recording to both camera and external recorder, confirm both are working.
Pro Tip: Don’t just look at meters, listen. Waveforms and meters won’t always reveal background noise, pops, or tonal issues. Your ears will.
Last Words
Great audio doesn’t happen by accident, it’s the result of planning, awareness, and good technique. By applying these 10 tips -from choosing the right mic and monitoring live to capturing room tone and testing before you shoot- you’ll dramatically increase the quality of your videos. Remember, viewers will forgive imperfect visuals, but they won’t sit through distracting, muffled, or noisy sound. Make audio a priority, and your projects will instantly feel more polished and professional.
Want to keep learning? Follow me on your favorite social media (handle everywhere: @MediabyHamed / search for Hamed Media) or subscribe to my newsletter for more practical tips and guides like this.
FAQ
Do I always need an external microphone for good audio?
Not always, but an external microphone usually provides much better clarity and reduces unwanted sounds and noise compared to built-in mics. For interviews, voiceovers, and high-quality content, investing in at least one good external mic is highly recommended.
Can I use wireless microphones for all situations?
Wireless systems are great for mobility, but they can be prone to interference and battery issues. For controlled environments or critical recordings, wired systems may be more reliable.
How important is monitoring audio while recording?
Extremely important. Monitoring allows you to catch issues like low volume, clipping, or background noise immediately, saving hours of frustrating fixes in post-production.